Well as it’s still early in Feb, any canoe trips are still a few weeks off for us, but I’ve been out and about a bit and saw these deer today grazing by the local lake – looking forward to getting off the road and onto the river soon though… won’t be long now: I’m hearing the Song Of The Paddle strongly now and can’t wait to get out there.
Category Archives: Canoeing and Bushcraft
Canoe-Camp Boots
I’m needing some new boots after getting many years good use from my previous pair – and these are currently getting my vote – not cheap at £70-ish, but they do have the “TNF” logo on so that’s always going to involve a premium… but lets get down to basics – what do I need from Canoe-Camp boots? Why this style?

Well Bill Mason said way back that the rubber and hide boot was his preferred boot for canoe-camping expeditions, and I’ve used that style boot for many years and also find them to be better than either full leather ‘hiking boot” style, full rubber ‘wellington’ type boots or other kinds of canoe-shoes such as those made of wet-suit material (definitely not suitable in winter!).
My current pair… working hard around the camp!

The rubber means trapsing around in mud at the waters edge, or an inch of water in your boat, or the inevitable getting in and out won’t be a problem. It provides good ankle support for feet squashed in the bottom of an open canoe where your ankles can get into some pretty weird positions, but also allows some movement. And the hide part above the foot is also very flexible of course, where you need it.
In the past and representing a cheaper alternative, we’ve used these at £30 from Groundworks, not bad for the money, but not very comfortable or supportive when walking, and not really a long-term option – your boots should be your 2 best friends when out and about!

Bill Mason wore his with native American style moccasins inside, pointing out that at the camp you can just throw off the outer, and leave them at the door, and this does sound ideal. More important in extreme cold weather where you need to get your feet out of boots, into the dry and let them breathe more. I don’t have the real need for that route (although it’s sub-zero here in the west country as I write this!) and so the PrimaLoft insulation layer on these boots will do the same job generally – these boots will apparently get you out in up to minus-25 degrees! The other features look useful:
* Fabric: Waterproof Nubuck and Suede combination leather upper / 200g PrimaLoft® Eco (insulation)
* Double-adhesive latex, seam-sealed upper construction
* Dri-Lex fleece collar and tongue lining
* Anatomically engineered, injection-moulded waterproof TPU shell with forefoot flex grooves
* Rustproof hardware
* Gaiter compatible D-ring
* Injection-moulded shank plate
They’re called TNF “Chilkats” and are on sale online at Taunton Leisure currently with 10% off, which is needed frankly – that way you’re not paying quite so much for that sought-after TNF logo!
![Reblog this post [with Zemanta]](http://img.zemanta.com/reblog_e.png?x-id=38a1a53d-2892-44e2-b6cc-effe149c88eb)
Snowbound in a Campfire Tent
The Campfire Tent has been getting good use during this winter snow: kind of a ‘Backyard’ test for a snowbound winter camp here. The campfire tent proving itself again – giving great shelter from strong and bitterly cold Northerly winds, whilst allowing the openess for cooking, observing nature and snowbound views, and generally ‘messing about in tents’! In this weather the views have been absolutely stunning and I haven’t missed a thing – including a huge shooting star one evening. I set up just before the snow came in 10 days ago, and after the main snowfall the roof of the tent had about 5 inches of snow weighing it down – that’s a LOT of weight, and happy to say the canvas, stitching, poles and guys all stood up to the test. The pegs have been completely frozen into the ground so they aren’t going anywhere, which has helped in the very strong winds we’ve had. Walking the fields all the activity of nature is written into the snow in footprints – from tiny mice trails and bird footprints, to thin and whispy deer tracks and big badger prints – all the activity you’d normally miss in the dark is recorded for the following morning.
Also here is a backyard test of a new “Hekla 30 firebox“ from Tentipi, a great bit of kit I’ll write more about in detail later.. The tent itself is from Green Outdoor and features in the Winter Camp story below. For now here’s the video:
Fred J. Speakman – Bushcraft Writer Remembered
POTP reader Colin Tennant provided this piece on some background to early ‘bushcraft writer’, the naturalist Fred J. Speakman (his books covered in our post here). He’s just completed a 90 minute DVD of a talk with Peter Read, a naturalist and resident of Epping Forest. Peter met Fred when he was eighteen and is a font of knowledge about Fred’s work and the forest. Here’s an extract with some fasciniating oral history of the Epping Forest area.
Oral history for Loughton and Buckhurst Hill
During the first half of the 20th century Loughton played host to thousands of East
End children who visited the Shaftesbury Retreat on Shaftesbury Road. School pupils
from some of the poorest parts of London were treated to a day of fun and fresh air in
the Forest at one of the many tee-total retreats that once littered the Forest.
Joyce Casey who now lives in Chingford, remembers visiting a retreat with her
school:
“When we got off the train and we were told that we had to be very quiet and we had to
walk along very quietly and so we did. We were very subdued but we were all bubbling with excitement inside so we walked along until we came to a clearing in the Forest and we entered this gate, and there was a kiosk in the middle and then we went
into this building and we sat down on the wooden benches with wooden tables in front
and there we were given a sandwich and it seemed to be that it was dried bread with
corned beef or paste or something in it and a glass of water and we had to have it
blessed.
After we’d eaten they then said “we’re taking you to the Forest” so we were taken to
the Forest and there we were playing rounders and various other games. I remember
going to a pond and seeing all these tadpoles and the frogspawn and everybody was
getting very excited about it, of course we all wanted to take some of it – Canning
Town would be alive with frogs! But of course there was no way to take any, and we
were going in the water and coming out and here again there was no one to tell us not
to, we were just free spirits. I presume that the teachers were around, but I have no
memories of anybody saying you shouldn’t do this or you shouldn’t do that. Anyway,
after a couple of hours or so we were rounded up and then we all walked back to
where we were going to have tea.
You can imagine all these children who had been clean at the beginning of the day
were now covered in mud splashes and socks were down, and ribbons had come out
of your hair and so forth! We went back and had a current bun and a drink. We milled
around the kiosk that sold sweets and then we all had to walk back very quietly and
demurely down to the station and we all got back on the train. I remember going to
bed that night and I’m sure I must have had a smile on my face thinking about what
had happened during the day, and that was my introduction to Epping Forest.”
David Gannicot remembers meeting Fred Speakman, local naturalist, author and
educationalist, whilst watching for badgers at Goldings Hill:
“When badgers were much more common in the Forest, I often went with my brother
or a friend to a sett in Epping Forest to await their nocturnal explorations for food.
Since badgers have a keen sense of danger, it is necessary to settle down quietly in the
Forest about an hour before dark if you want to see them. To a young lad, the Forest
could be quite eerie with the trees taking on weird shapes as total darkness
approached.
The date was the late 1940s and the sett was about half a mile off Goldings Hill. One
evening, having patiently sat still for a couple of hours, we heard a quiet padding
noise from our rear. We assumed a badger had left a different sett to the one we were
observing. The muffled sound continued for several minutes and I began to think it
was not being made by a badger. Suddenly, out of the darkness a human figure
appeared. He had made hardly a sound. The man was Fred Speakman, a local
naturalist. We didn’t see any badgers that particular evening but were thrilled to
have met this knowledgeable man.”
For Kathleen Hollis the Forest was at the centre of her childhood:
“My sisters and I spent many happy days of our childhood in Epping Forest. Our
garden gate in Princes Road opened on the Forest, Lords Bushes and Knighton
Woods. We knew every pathway like a map. Many places had names- Side Path,
Middle Path, Suttons Bump, the Jungle and the Plain. We enjoyed going wooding with
my mother to get wood. We were only allowed the dead wood to help boil our
copper, to get hot water for washing and bath night. In the autumn we piled leaves in
heaps to jump into from trees, or if we were lucky enough to find an old pram, we had
a race track.
In the winter, the lakes and ponds of the Forest would sometimes freeze over. Beryl
King, who lived with her Forest Keeper grandfather Mr Humphries at Knighton
Wood, remembers hearing her relatives talking of one very important visitor who
enjoyed skating: “I believe Teddy Roosevelt used to come over. I mean I can’t remember that, it’s before
I was born, but they used to put all fairy lights in the trees round the lake and they
used to be able to skate on it! Yes, you could skate in those days. I learnt to skate up
there and my grandfather was a fine skater. It used to freeze over even after it went
into the Forest and I remember they had to put the danger warning signs up, as the
Lake was very deep in parts.”
Winter Get Out & Stay Out Trip
So the December weather seemed to be clearing after weeks of rain and after ruling out the river Wye with water levels dangerously high we decided to head for the hills this time for a winter Get Out an Stay Out trip and to test out some new pieces of gear.
Loaded in to the back of the Landrover was; top of the list the new full size campfire tent from greenoutdoors.co.uk; a new Australian “Burke & Wills” swag (to go with our old razorback one), a new dutch oven cooking pot freshly seasoned, and last but definitely not least a new black STORM kettle from the Eydon Kettle Company.

That was just the new stuff we hadn’t tried before – add to that the old swag, thermarest mats, food and drink, clothing ( lots of it it was very cold especially with the fierce windchill!) and assorted bushcraft saws, knives, firesteels torches and so on, the back of even this high capacity pickup was looking pretty full. But hey that’s the beauty of off road camping trips: bring whatever you like! So we skipped the ‘get tuff with your stuff’ stage and just threw it all in the back.

The weather had been pretty awful over night and TheRanger’D drove right through the tail end of the storm crossing the country to Somerset for our trip. but by the time he arrived it had cleared Out West and although bitterly cold in the wind the sun was there at last, however weakly!
So we fired up the tractor-like diesel Landrover 110 and set off for the mendip hills.

After driving some beautiful off road tracks, thick with mud under the all-terrain tyres after all the recent rain, we stopped in a small grove of trees for a brew. A first chance to use the gorgeous new Eydon STORM kettle, and also to gather some decent kindling and firewood for the nights camp. As usual, and not yet fully tuned in to the pace of the bush I rushed the first attempt without decent kindling in the kettle and had to restart – will I ever learn! But The Ranger’ picked some perfect kindling from standing dead wood and at the second attempt the new kettle was soon firing away, and we sat down next to a small rushing brook, the water swelled and clouded by the recent rains.

The black ‘Popular’ STORM kettle is truly a beauty. Whether it’s the shape or the new matt black coating don’t know but somehow it feels more solid and trustworthy when you’re Out There than the usual shiny aluminum or stainless steel ones: they get blackened with use anyway: so it’s as if this one is already ready to go…
So first and much needed hot cuppa downed we gathered some more wood and loaded up the back of the Landy, leaving behind this great spot in the woods and heading off into the windy weather again.

A check of the accuweather.com iPhone app showed some storm warnings ahead, so we decided to cut short some of the off roading plans and concentrate on getting enough firewood and getting to the campsite before dark. This turned out to be a wise move as it happened…
The next ‘greenlane’ (an off road track with public motor access classed as “Byway”) was a stiff climb up to the limestone ridge of the Mendip hills and the Landy grinded it’s way steadily up over gravel washed out by the recent rains.
So back on the tarmac again we wove our way through a lot of surface water along narrow lanes across the top of the Mendip plateau towards the campsite on the southern edge of the hills, where they drop spectacularly down to the flat ‘Somerset Levels’ with Exmoor and the Quantocks the next ridges in the distance. We stopped at Stock Hill woods, an area of pine trees and heath that looks like a piece of Scotland in Somerset, and went into the forest to gather some pine tinder from fallen tress – you can’t beat thin pine twigs and pine cones for firestarting.

We’d had more rain along the route and the sky was thick with fast moving grey clouds, so when we arrived at the campsite (near the magical medieval village of Priddy) in a patch of sunshine we knew we had to take the opportunity to get set up before the next band of rain came through.

Personally I was keen to get another cup of storm kettle tea going first and maybe some hot food, but reason prevailed and we got to work: first job to unroll the Swags, my old ‘Rzorback and the new “Waratah” genuine Australian swag from The Aussie Shop – a really nice piece of solid gear as you can see here:
The swag is made of thick canvas, with a single hoop at the head end made of aero-grade aluminium, line fixings to raise the peak of the canvas up if necessary, a zipped mozzie net, canvas flap cover and some simple but very tough features like big zips, a canvas end “window” which rolls up, a thick PVC waterproof base and a built in high density foam mattress which is extremely comfortable. I know a bit about swags and can say the build quality of this one is top notch – this is truly a piece of gear that will last at least one lifetime! The top flap can be left open in good weather, giving a view of the night sky, one of the key experiences of swag camping. As we were in December we used the swags as bedrolls inside the open tent, giving effectively a groundsheet, mattress and comfort away from drafts, with sleeping bags fitting snugly inside. It was only a couple of degrees above that night, and below freezing in the windchill but the swags provided so much shelter (they keep a lot of your body heat close to you rather than it escaping into the air) we were extremly warm inside – no socks required even which is a true test!
The ‘Campfire Tent’
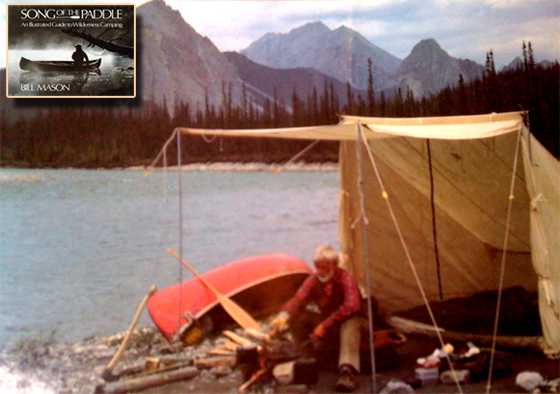
Swags and bedrolls ready the next job was the big one: putting up our main shelter, the new full size Campfire Tent from greenoutdoor.co.uk. The tent comes in a large single main bag made from the same waterproofed environmentally friendly ‘hemp-cotton’ canvas as the tent itself, and inside that the main tent, the additional (and optional) wings and front awning, inner tent and groundheet, a bag of poles, pegs and a simple repair kit. It’s based on the traditional “Baker Tent” designs of the 18th Century fur traders and voyageurs, and more recently popularised by Bill Mason and lately by Ray Mears himself: Here’s Bill Mason’s original tent on one of his canoe expeditions:
We were planning to use only the cut down version on this trip, as the classic ‘Bill Mason’ campfire tent format, even though with this modular design there’s a lot more this tent can do. This is very important because it means you only need carry and setup the parts appropriate to your trip based on the weather conditions and the amount of weight you want to carry depending on how you are traveling. So for canoe travel in good weather the pack can be really quite light at 10kg in it’s basic form (but still a full camp-fire tent in itself!) or for car or 4×4 travel you can take the whole lot, inner tent, groundsheet, wings and awnings and extra poles at the full weight of 27 kg: one nice thing is that even at that weight the full modular tent fits in the single main bag.
Here’s the tent straight out of the box – really nicely packaged actually, in the same soft brown natural color the tent is made in.

So here’s the campfire tent in it’s minimal configuration, no wings, awning or groundsheet, and just 3 poles: the ridge pole and 2 verticals:

For a view with the wings attached, supporting poles and awning set higher, which creates a much bigger internal space see the “Backyard Test” video.

On this trip with Landrover lugging capacity of three tonnes(!) we bought the whole thing even though we only planned use the main outer shell, not the inner tent or even the groundsheet sleeping as we were in australian swags with thick PVC bases. The tent is extremely well made and beautifully finished with lots of nice touches such as the roll up side and rear windows, with excellent fasteners and velcro and zip fittings for the awnings that worked very well and were easy to fit very quickly even with very numb hands from the windchill we were experiencing.
So we set about getting to know this tent in real world and actually quite rough conditions, the tent having already been given the ‘backyard test’ previously – see here.
The wind was buffesting the canvas as we set it up, but we kept our heads down and ignored the wind-chilled fingers and got the tent up in no time at all – it really is a very simple design to erect, just peg out at the back and insert the ridge pole, raise the front and get pegging! In the weather we had we made use of all the many fastening points and guy ropes. It’s a good job because as you will see in the video the already strong winds turned into gale force during the night!

So tent up and facing onto the fire spot, the next job was to get a fire going asap. Immediately we had the tent up we had shelter from the windchill and the camp was starting to take shape. Gear was loaded inside the open tent and we set about getting the fire started, keen to get the real benefit of the open “campfire-tent” concept.
With the pines twigs gathered and some tumble-dryer fluff, a single strike from my fire steel was enough to get the fire started, aided by the stiff breeze.
Fire going, the STORM kettle was placed stright on the flames and hot tea provided in no time atall.
So we’re were all set up. The wind picked up steadily driving down the windchill temperatures – and now’s the real revelation: sitting under the awning in front of an even moderately-sized campfire, the side wings attached on the campfire tent, the effect was incredible – the campfire tent concept really proved its worth and we could have sat out in T-shirts even in this otherwise freezing cold weather. The heat from the fire bounced around the inside of the campfire tent, but still left us “outdoors” fully and open to our surroundings. The new Dutch oven bubbled away with a vegetarian stew prepared by the fire, and boy was that a welcome meal once it was ready. Hot food outside in cold weather is always the best food you’ll ever taste – the best restaurants in the World can’t touch that.

As the evening drew in early, the weather became even worse and suddenly at dusk the real storm kicked in – and it didn’t let up till morning! We were concerned in a new style of tent, up on a hillside facing the Atlantic coast of Somerset with a South-Westerly storm raging as to how this tent would stand up. The canvas was buffeted strongly all night over our heads, but in fact it withstood it completely without even any need to get up in the night and re-jig any part of the fixings. This is probably as extreme weather as I would plan to be out in aside from a high mountain camp, and knowing the tent can withstand this without a problem means it really is an all-purpose, year-round tent, not just for summer camps in good weather at a calm lakeside pitch. But with it’s open nature we’re going to use this year round – you can see why Ray Mears rates this kind of camping so highly.

So here’s the video of the camp experience (try it full screen in HD!) – We had a great trip despite the weather and plan more winter trips using this tent as it the “campfire tent” model works so well in winter, with the fire outfront, glowing away.
For more information on this tent see the Green Outdoor website or read our “Baker Tent Hunt” series.
[Update: this tent is currently on sale at £100 off, making it £499 and excellent value – see greenoutdoor.co.uk ]
Campfire Tents – Ray Mears Baker Tent
Ray Mears has done more than anyone in recent times to promote the benefits of Getting Out & Staying Out, and particularly he has shown himself a great believer in the open-to-your-surroundings nature of the Campfire Tent or Baker Tent. In his episode on Roger Rangers in the North East United States and Canada he showed a complete camp set up using 2 baker tents, in some really beautiful woodland.
For a modern baker tent see our video review of the Campfire Tent or our feature on our ongoing “Baker Tent Hunt”.
Here’s some pictures of Ray Mears Baker Tent Camp – makes you want to Get Out & Stay Out doesn’t it!


Ray’s set up shows perfectly the combination of openeness, ability to be warmed by a fire in front, and of cooking on the fire whilst staying sheltered in your tent. But the main benefit of the Campfire tent is in this open-ness to your surroundings – if you’re out there you don’t want to miss a deer wandering past your camp, or the chance to make a wish for a lottery win on a shooting star burning up in the atmosphere above you. Or an owl that flies low across your camp in the early evening. Using open tents these are all things I’ve experienced on my travels.
Canoe Hire – River Wye
If you’re new to open canadian canoeing then probably the best place to start with this fantastic outdoor activity is on the River Wye which borders Wales and England at the southern end. It has the best established river navigation rights of any river in the UK and as such many operations have set up to provide canoe hire and support facilities. many hire companies will provide you with canoes and all the necessary equipment, life jackets (PFD’s) and waterproof storage barrels but importably for planning any trip they will often arrange to pick you up and drop you off at the start and beginning of your trip, making it really easy to arrange a great trip on the river, either for a few hours or even several days with campsites provided along the way. Full instructions on where to stop, what the different parts of the river are like, and even training can be given.
Here’s a list of Canoe Hire companies you can contact to get started:
The River Wye Canoe Hire Company
Monmouth Canoe & Activity Centre
Paddles & Peddles (Canoe & Bike hire)
Campfire Tent – The Winter Camp Test
We just returned from a very eventful “Get Out & Stay Out” winter camp in the hills. We were very excited as part of the trip was to test a new “Campfire Tent” – a full size, modern and innovative canvas tent using environmentally friendly materials and manufacturing (from greenoutdoor.co.uk), and based squarely on the original “Baker Tent” concept from the days of the trappers and “voyageurs” in Canada’s Northern Wilderness – more recently made popular by Ray Mears ( see our Ray Mears Campfire tent feature) – and in between kept alive by the pioneer of canoe travel and wilderness camping Bill Mason.
We were planning to do this on the River Wye as a winter canoe camp trip, but with the recent constant rain in November and December the river levels were much too dangerous and all the camping locations we’d have used are now submerged! So we headed for the hills in Somerset, and as you’ll see hit some spectacular wild weather. This made it a really tough test of this tent, to which it stood up very well indeed, but more on that later. Suffice to say having spent time using this tent to shelter from sub-zero windchill conditions, and gale force winds and driving rain I am even more impressed with it than I expected to be. We’ll publish a full review of the tent and our experiences shortly, along with a full trip report but for now here’s the video of the campfire tent in use.
For more information on this tent see the Green Outdoor website or read our “Baker Tent Hunt” series.
Eagle-eyed viewers will spot a new “black kelly kettle” in use here – it’s actually an Eydon “STORM” kettle, a new black version that we fell in love with on this trip, providing as it did many cups of hand and heart-warming hot tea!
Gear Review – Berghaus Waterproof Jacket
Currently a great deal on at GoOutdoors.com is the Berghaus Peak Waterproof jacket where this excellent waterproof is reduced from £149.00 to only £59.00 – a huge saving of £90!! So I dived in head first and took the chance to own one of these at this bargain price, click here for the web offer page.
The pictures on their website look rubbish and really don’t do it justice as it’s a really nice looking piece of rain-proofing gear, so here’s mine below, it has excellent freedom of movement, is extremely light and with a lot of nice features and excellently finished.

Tripod for Cooking – the Ray Mears Way
With some new Dutch ovens pots on there way to me via Fedex, I was interested to see Ray Mears in his Northern Wilderness series using a traditional tripod simply made from some branches found at the camp site. Ray explains how this was in fact the way the “Voyageurs” worked, saving weight by not having to carry a metal tripod. Again unlike the classic dutch oven tripod set up there’s no metal chain suspending the pots either – instead ‘Withy” or thin sampling branch twisted to make it more flexible was used by Ray in this example. Further withies were used to secure the tripod legs at the top – here’s some outtakes:


We’ll be trying this method at our next camp, once I’ve properly seasoned the new dutch ovens.
![Reblog this post [with Zemanta]](http://img.zemanta.com/reblog_e.png?x-id=965bf00c-df78-4fe6-ba95-5aa184394042)